Friday, February 28, 2014

DIY Distressed Booth Furniture

I made my own milk paint to distress this collapsible roll top table I made for my vendor booth.  I would love to do tutorials but I get into the process of creating/building and forget to do before pictures. Besides, I look to tutorials to figure out how to do stuff anyway--why recreate the wheel?  (I'll give links to tutorials at the end of the post).


Since I forgot to do a before picture, I snapped a shot of the underside of the roll top table I built for my booth (why paint it? No one is going to see it). 

I made milk paint from milk in my fridge that was near its expiration. I was assured by the many tutorials I read that the smell would go away once the paint dried, and it did.

Thank goodness for that. My living room smelled like the Kraft cheese plant I used to work at where they made the cheese for Macaroni and Cheese and other products--makes sense, milk curd/cheese...anyway. 

I love the look of the Gunstock stain I used on all my booth furniture, but I'm going for an Anthropolgie-type feel in my booth and didn't want all the furniture/fixtures to be the same, so I distressed it. 

I'm not sure my milk paint turned out like it should--thick consistency, and transparent color (I did three coats). Regardless, it turned out pretty good anyway. Because it went on the way it did, it distressed itself--very easy process. I've been interested in distressing furniture for a while, and since this was so easy I'm ready to distress something else.

I'm finished it off with some paste wax to protect it. Easy peasy. 

I looked at several tutorials on making your own milk paint (including Martha Stewart's site--go there) and distressing furniture  but since I used this gal's blog not only for the distressing, but also for the replica Pottery Barn easel I made for the booth, I will post a link to her site. http://ana-white.com/2013/04/authentic-vintage-distressed-finish-minwax-stain. 

I used this instructable as a jumping off point for my roll top booth table. http://www.instructables.com/id/Make-a-collapsable-table-for-concerts-in-the-park/step13/Put-it-all-together/ 

Monday, April 1, 2013

Writing Anxiety


I am a professional writer.  My writings have been published hundreds of times in magazines; yet, I have anxiety about writing.  Not just my professional writing, where I have to please three audiences: the editor, their readership and my client (while also getting leads), but also blog writing (can you tell by the incessant posts) and in my screenwriting.

I force myself to sit at my computer while I don't write (or edit the same paragraph over and over).  I can sit for days at a time, taking breaks to pace the rooms of my house.   I don't let myself leave the house except to go down the street for soda, coffee or cigarettes which are all essential to my writing (if that were true, I'd have hundreds of novels in print).

For most of my life I have considered myself a writer, but I often wonder if it is really who I am "supposed" to be.  How good of a writer can one really be with writer's anxiety?  You can't sell screenplays that aren't finished, and you can't have a successful blog if all you have are drafts.

I create art without anxiety and I get lost in the time.  I'm a great editor (others').  Would it be the same if I were relying on it for my survival?

Instead of a therapist these days, I turn to the Internet for answers to life's dilemma's and stresses.  I search for others with similar situations to mine and see how they positively handle things and see if anything rings true for me.

This is what what I found today on the Internet:  writing anxieties live in the mind (I paraphrased, slightly).

I also found this blog about professional anxiety that helped boost me a bit.  

Now back to writing--professionally.


Thursday, December 13, 2012

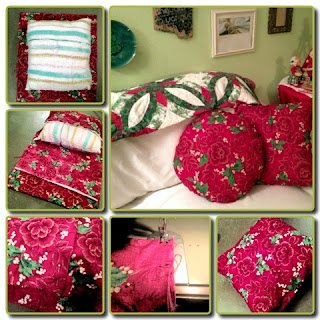
How to Make a Throw Pillow Cover in 10 Minutes

I've been dragging around Christmas fabrics for years.  They do get used pretty much every year but one of the things I wanted to do with them for years was to make throw pillow covers.

This year, I was determined to get them done.  I've been super busy, but I knew that they would really set the mood for the holidays, so I got out the scissors, eyeballed and cut out a pattern (of sorts) and sewed it up on the machine--I didn't even iron the fabric.  Then I made a second one and timed it.  10 minutes.  Not bad!


Here is a step-by-step tutorial for making throw pillow covers in ten minutes.

Step 1.  
Cut a piece of fabric about 1.5 inches wider than the width of the pillow on each side and long enough that it overlaps about 5 inches (the fabric in the photo to the right is folded in half under the pillow).  If you have an extra fluffy pillow, make sure the sides of the fabric reach half way up the side of the pillow


Step 2. 
I worked with the fabric right side up since I was working without a pattern.

After the fabric is cut, place the pillow on the fabric so the fabric on one end folds a little more than half way over the center of the pillow.

Then on the other end of the fabric, fold a piece inward. You want to make sure that when you fold the folded piece over the pillow there is enough overlap that when the pillow is stuffed inside, it won't gap. So wrap the fabric loosely around the pillow. Then pin the folds in place. I used only two pins (I was in a hurry) but you can use more.


Step 3. 
Turn the cover inside out. And sew the two sides only.

Step 4. Turn the pillow cover right side out and stuff the pillow inside.


Voila!  New decorative pillows fast and cheap!


I also made a round throw pillow cover.  I did everything the same, except that when I turned it inside out to sew it, I then cut it into the round shape before sewing.

Let me know if this tutorial was helpful, or if there is something I can do better with these tutorials.

Wednesday, December 12, 2012

It's Only Tuesday?!

It is only Tuesday but it feels like it should be Friday.

I just finished a story for my day job--WOO HOO!  Now I can get the bubble lights on the tree so we can start hanging the ornaments.

I got a garage door opener for a steal Thanksgiving weekend and it is still not up.  Maybe by this Friday I won't have to manually open and close my garage door.  It's not so much the opening and closing it, but having to lock it and unlock it from the inside that makes it a pain.

New rack and pinion steering for the car (cha ching).  I used to understand what rack and pinion steering was and why it was a big deal when I sold cars, but it escapes me now...just looked it up.  I guess I didn't really know back then either and after looking I still can't remember the benefit, but I know I talked about it.  I think it was one of those items that every car had, but because most salespeople don't sell every aspect of the car and if you are the only one actually "selling" the car, yours sounds like it has more features than others--like those triangles bent into the body in the engine compartment that are there so the car folds like an accordion in a front end crash, absorbing a portion of the impact so occupants are safer.  Now that is a cool safety feature.

I knew I needed new tires--they weren't impressive tires in the first place but the steering really wreaked havoc on them--but now that the steering is fixed and aligned I have to get new tires so I can tell that I have new rack and pinion steering.  I had to order them to get a good tire in my price range. I hope the product matches the good reviews.  I wonder if you can return tires if you don't like them?   I got them at Costco.

I have a tutorial that I have been wanting to post.  "How to Make a Throw Pillow Cover in 10 Minutes".  Super easy and fast--I didn't even iron the fabric.  Will try to get it posted in the next day. Here is a little preview.
Make throw pillow covers in ten minutes

Till the next time...


Monday, October 8, 2012

Bridge to Nowhere - I'm a Billy Goat

Not Sarah Palin's Bridge to Nowhere, but the one on the San Gabriel Mountains, north of Azusa in California that used to go somewhere, or was supposed to-the road that led to it was washed out before any cars could drive over the bridge.

Lauded by Modern Hiker magazine in 2007 as "one of southern California’s best hikes – a 9 mile river-hopping trip along an abandoned, flooded out roadway. Plenty of mines, swimming holes, and a giant bridge in the middle of nowhere."


This was an intense hike, in a good way, for me, the beginner backpacker who is learning to trust her knees again--legs really--and getting back in shape!  It included frequent climbing over rocks,  a small section of trail that was barely the width of my boot, and several river crossings.

Yup, those rocks are the trail.
This was the Billy Goat section of the trail.  Scary!
I really feel like I accomplished so much on this trip; and, that had much to do with the Meetup group I was with--Los Angeles Backpackers Club--they were very encouraging and helpful.  If you are interested in something, I would suggest checking out the meetups in your area--it really is a great way to pursue your interests with people who are like-minded.

It was long (longest I have done so far--9 miles round trip) and beautiful (I love hiking along rivers).  I'm beginning to really appreciate the chaparral (a shrubland community), and I saw the biggest Yucca plants I have seen thus far.  Oh!  and the rocks, beautiful striated rocks.


I was testing out some new gear (new tent, different sleep pad, clothing in prep for the possibility of 45 degree temps, and a new alcohol stove) and my pack ended up being top heavy on the way in.  At one point, climbing up and away from the Billy Goat area my pack was pushing my head forward and I couldn't see where I was going and it was terrifying.

Very pleased with my new tent.
The trip organizer was patient, calm (either I was not as panicked as I thought or he was angel--I think angel), and supportive, as were the other members on the trip.  Everyone on the trip was willing to put out their hand, or trekking poles, to help me up or over, or carry my pack, on what I perceived as a particularly hairy area--and I was worried I would pull them down as they helped me.

I tossed my pride twice and let someone take my pack so I could survive!  It truly is mind over matter.  Someone commented on one of the river crossings that if the log was a painted line on the street, it would be no problem (and I kept chanting that to myself as I "walked the line"), and another reminded me, "momentum is your friend" (just keep going and don't stop to think about it).

There was shocking amount of trash above where we camped.  There were tents,  piles and piles of cans, bottles, and other trash.  The worst was the "bathroom" that someone (or many someones) had made above the camp--they didn't even bury it--and there was toilet paper everywhere. I just don't get it.

In the morning my legs were wobbly and I felt generally shaky all over.  I hoped that the Mountain House bacon and eggs would fix that, but it didn't. At the first stream crossing, over a log, I was sure that the organizer could see my legs shaking during my several false starts, but at least in the still pictures, I didn't look shaky.

It was a great trip and I would definitely do it again.  I was almost too tired to notice the clean house (with mopped floors!) that I came home to, thanks to my daughter.


Tuesday, October 2, 2012

Photo Booth Fear & Apron Envy

I have no idea why it took so long for me to make my photo booth (light tent)--I've had the supplies for at least a month now.  It was really very simple, maybe it was all the "instruction" up front that made it seem complicated--maybe it was...aw who cares, it's made and in use.  The step-by-step was easy to follow and here is the link to the tutorial.


I'm almost done photographing the pendants (and other stuff) that is slated to go up on the Etsy site which still doesn't have a shop name.  Any ideas?  Anything I pick is already taken or seems cheezy and picking a name seems so permanent and I want to do it right the first time.  Like, I saw someone on FB that markets his pottery as Speckled Dog Pottery--that is original.  Heck, I can't even decide which last name I want to use--I've had three.

After the photos it's on to organizing the shots and pricing, but what I really want to do is to make myself an apron.  I have been wanting to make myself an apron since last December when I made them for others and since I had the sewing machine out for one of my 365 Discards project, I figured why not?.

But the boss of me said I had to do the light box and photos first since I was already behind schedule.  So, a little more photography and then I can craft myself a cute little apron to protect my clothes from kitchen stains. Woot!

Thursday, September 27, 2012

Backpacking!!!

This is info from my 2nd backpacking trip--I've now been on 4. This trip was to Cedar Glen Trail Camp via Icehouse Canyon Trail.

You know what I think about when I am backpacking or hiking?  Just that -- backpacking or hiking -- and I love that!

I watch the birds and think about mountain lions, and snakes and bears.  I look for game trails and observe scat (a couple weeks ago I would have said animal poop).  I even notice the scars on trees, and I know what it looks like when a bear makes those scars.  I look at foliage and wonder if it is friend or foe.

I listen to, and observe, the other backpackers, even if they are newbies like me, because it teaches me.

I was utterly surprised at my excitement level when I committed to the trip.  I can't remember being that excited about anything in a very long time. I was even brave enough to hitch a ride with two other attendees.

I was excited to try out my vintage Kelty backpack that some kind soul, from freecycle, passed on to me.  It was a little top heavy on the way up making me a little off balance (especially near the top) and it bonked me in the head a few times.  But I packed it better on the way down--no knocking me over and no bonking me in the head.


More than 3/4 of the way up the trail I began to wonder if this really was for me.  Not because I was miserable, but because I felt bad lagging so far behind the group.  The trip leader backtracked from time to time to check on me, and reassured me that my pace wasn't a problem.   I did get my first blister (from hiking/backpacking.  It happened maybe half way up the trail and I kept going because tending to it would have made me even farther behind, but it was getting worse so I stopped to fix it up and was bummed I hadn't stopped as soon as I felt it.

I drank half of my water going up and stopped at a creek that crossed the trail to fill up.  This was my first time getting water from a creek to drink.  It was ice cold.  Now I had to decide whether to boil it or to use my pills.  Some of the group drank it straight from the creek and others treated theirs.  I would treat mine this time just to be safe.  Next time, I might try it without treating it. Boiling it meant no aftertaste, but if I were on a longer hike, fuel should be for cooking and I should find start.  experiment so I can see what works for me.  have to have an aftertaste

I felt like a slacker when I opted out of the day hike so I could nap--was 2.2. miles really all I could do? But when 2 others came back to camp shortly after embarking on the day hike I didn't feel as bad.

I discovered a saying , "hike your own hike," (HYOK), and it was one of those moments when you just "get it". I may be slower, but that is okay. I have to find my own groove.

I can't wait for the next trip!